






Preparing Your Heat Pump for the Shift from Cooling to Heating Mode
The Late-Summer Shift: Why August is the Perfect Time to Test Your System
The August late-summer back-to-school transition is officially here, and while your air conditioner has been working overtime to keep your home comfortable, the coastal evening chill is just around the corner. Preparing your heat pump for the shift from cooling to heating mode is one of the most critical, yet frequently overlooked, end-of-season tasks. Many homeowners wait until the first genuinely cold night to adjust their thermostat, only to discover their system is stuck blowing cold air. By that point, local technicians are often booked solid with emergency calls. The good news is that you do not need to be a mechanical expert to verify your system is ready for the seasonal shift. By conducting a simple, non-technical auditory observation today, you can distinguish normal operational sounds from potential mechanical failures before the weather turns. To help you secure your comfort year-round, we recommend reviewing our heat pump services and heating systems as you prepare for the months ahead.
Proactively testing your system now ensures you are not left shivering if an issue goes undiscovered. A heat pump is a complex piece of machinery that works year-round, meaning it experiences significantly more wear and tear than a traditional standalone air conditioner or furnace. When you switch your thermostat from cooling to heating, a specific physical transition must occur inside the outdoor unit. Listening closely to this transition provides immediate clues about the health of your equipment. If you know exactly what to listen for, you can catch a failing component while the weather is still mild and technicians have flexible availability.
Inside the Equipment: The Mechanics of Your Reversing Valve
Unlike traditional gas or electric furnaces, heat pumps do not actually generate heat by burning fuel or warming electrical elements. Instead, they move heat from one place to another using refrigerant. During the summer, they absorb heat from inside your home and release it outside. During the winter, they perform the exact opposite function, absorbing ambient heat from the outdoor air and transferring it indoors.
The Role of the Reversing Valve
The secret to this incredible dual-functionality is a specialized component called the reversing valve. This heavy-duty brass valve dictates the directional flow of the pressurized refrigerant traveling through your system's copper lines. This single mechanical valve is what allows Los Alamitos homes to comfortably handle warm daytime coastal influences and chilly nighttime temperature drops without needing separate heating and cooling equipment.
Understanding how this valve operates is a core part of essential heat pump maintenance tips. The reversing valve relies on an electromechanical solenoid—a magnetic coil—to shift a physical sliding mechanism inside the unit. Here is the step-by-step mechanical sequence that occurs when you adjust your thermostat:
1. The Call for Heat: Your indoor thermostat detects that the room temperature has dropped below your set point and sends a low-voltage electrical signal to the outdoor unit.
2. Solenoid Activation: The electrical signal energizes the solenoid coil attached to the reversing valve, creating a strong magnetic field.
3. Pressure Shift: This magnetic field pulls a small internal pilot valve, which redirects the high-pressure refrigerant gas to one side of the main sliding mechanism.
4. The Physical Slide: The immense pressure of the refrigerant forces the internal slide block to move from the cooling position to the heating position.
5. Flow Reversal: The primary flow of refrigerant is instantly reversed, allowing the system to pull ambient heat from the outside air and deliver it into your ductwork.
Because this process relies on both electrical signals and extreme physical pressure, the valve is susceptible to sticking, electrical failure, or mechanical wear over time. This is exactly why an auditory test is so valuable.
How to Safely Conduct an End-of-Summer Auditory Test
Conducting an auditory test during the August late-summer back-to-school transition is a proactive way to ensure your home is ready for fall. This test requires absolutely no tools, and you should never attempt to open the exterior cabinet or force any mechanical components yourself. This is strictly an observation of the system's natural startup sequence.
Pre-Test Preparation
Before you begin, choose a mild late-summer evening when your home does not require active, heavy cooling. If your air conditioner has been running constantly all afternoon, let it rest for at least thirty minutes before initiating the test. This allows the internal system pressures to equalize, giving you a clearer, more accurate auditory baseline when the system restarts in heating mode.
The Step-by-Step Auditory Observation
• Step 1: Position yourself correctly. Head outside to your outdoor condenser unit (or stand near your indoor air handler, depending on your specific system setup). You want to be close enough to hear the internal components engage, but keep a safe distance from the fan exhaust.
• Step 2: Have a helper adjust the thermostat. Ask a family member to switch the indoor thermostat from "Cool" to "Heat" and set the temperature three to four degrees above the current room temperature. This forces the system to immediately call for heat.
• Step 3: Listen for the initial click. As the thermostat sends the signal, you should hear a distinct electrical click from the outdoor unit. This is the contactor engaging to send high-voltage power to the compressor.
• Step 4: Focus on the transition sound. Immediately following the click, listen closely for the sound of the reversing valve shifting. This is the critical moment of the test.
• Step 5: Verify the airflow. After the system has been running for about five to ten minutes, head back inside and place your hand over a supply register to confirm that warm air is actively blowing into the room.
If you complete these steps and feel warm air, your reversing valve has successfully shifted. However, the specific noises you hear during Step 4 will tell you how smoothly that transition occurred.
The Sounds of Success: Decoding the Refrigerant 'Whoosh'
When homeowners stand next to their heat pump during a seasonal transition for the first time, they are often startled by the sounds the system makes. Because a heat pump operates under immense pressure, the physical shifting of the reversing valve is not a silent process. Knowing what a healthy system sounds like prevents unnecessary panic.
The Anatomy of a Normal Transition
The primary sound of a successful transition is a distinct, audible 'whoosh' coming from the outdoor unit. To an untrained ear, this sudden rush of sound can mimic the noise of a punctured tire or a massive air leak. Homeowners frequently worry that their system is venting expensive refrigerant into the atmosphere.
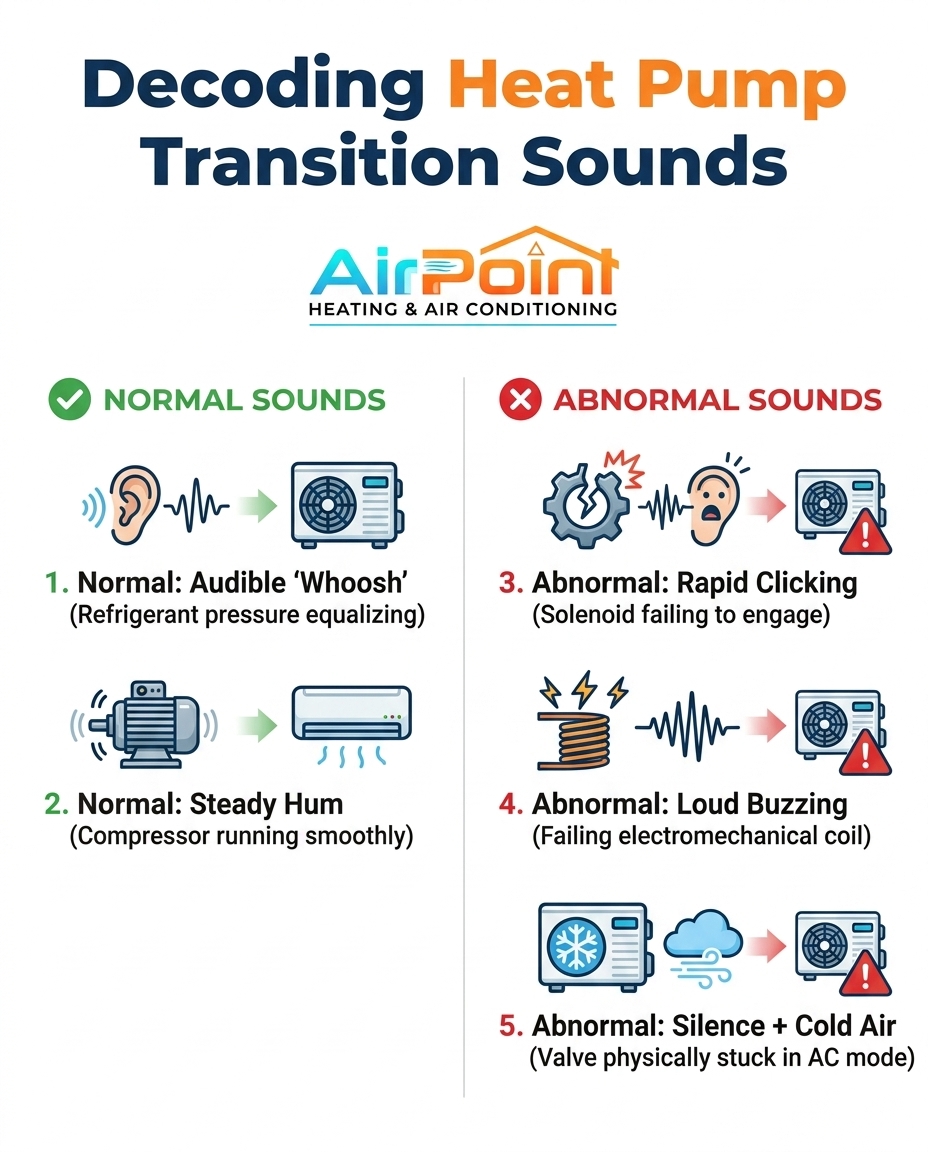
In reality, this sound is not escaping air or leaking gas. It is simply the sound of the audible 'whoosh' of refrigerant pressure equalizing rapidly across the system as the flow reverses direction. Because the compressor is pushing high-pressure gas through the lines, suddenly changing the direction of that gas forces it through the newly opened pathways in the valve. Hearing this 'whoosh' is perfectly normal and serves as definitive confirmation that the sliding mechanism inside the valve has successfully shifted from cooling to heating.
The Operational Sequence You Should Hear:
• The Click: A sharp, single electrical snap as the system receives power.
• The Whoosh: A 2- to 5-second rush of pressure equalizing inside the copper pipes.
• The Compressor Hum: A steady, rhythmic humming or buzzing as the compressor ramps up to full speed.
• The Fan Spin: The smooth acceleration of the outdoor fan motor pulling air through the exterior coils.
Once the pressure equalizes and the 'whoosh' subsides, the system should settle into the familiar, steady hum of the compressor running. If your system follows this exact auditory pattern, your reversing valve is functioning exactly as engineered.
Auditory Red Flags: When the Valve Struggles to Shift
While the audible 'whoosh' of refrigerant pressure equalizing is a sign of a healthy system, other noises indicate that the reversing valve is struggling to perform its job. Because the valve relies on both electrical signals and physical sliding mechanisms, failures can happen in a few different ways. If you hear any of the following auditory red flags during your late-summer test, it is time to schedule HVAC service before the cooler weather sets in.
Common Reversing Valve Warning Sounds
• Rapid, repetitive clicking — The Likely Mechanical Cause: Electrical solenoid failure or a faulty control board relay. — What It Means for Your Home: The system is trying to send the signal to shift the valve, but the electrical component is failing to engage. The system will likely remain stuck in cooling mode.
• Loud, continuous electrical buzzing — The Likely Mechanical Cause: A failing electromechanical coil on the reversing valve. — What It Means for Your Home: The coil is receiving power but cannot generate a strong enough magnetic field to pull the pilot valve. This often requires replacing the electrical coil.
• Hissing or bubbling noises — The Likely Mechanical Cause: A potential refrigerant leak or low system pressure. — What It Means for Your Home: If the system lacks sufficient refrigerant pressure, it cannot physically push the slide block inside the valve, preventing the transition to heat.
• Complete silence followed by cold air — The Likely Mechanical Cause: The valve is physically jammed or stuck in the cooling position. — What It Means for Your Home: The electrical components may be working, but internal wear, debris, or a lack of lubrication has caused the brass slide to seize entirely.
The Danger of a Stuck Valve: A reversing valve that is stuck in cooling mode is incredibly frustrating on a cold night, but a valve that gets stuck halfway between heating and cooling is a serious mechanical emergency. If the slide mechanism jams in the middle, high-pressure and low-pressure refrigerant can mix improperly, causing the compressor to overheat and potentially suffer catastrophic failure. These auditory red flags require a licensed professional to diagnose, as replacing or unsticking a reversing valve involves handling high-pressure refrigerant safely and legally.
Why Proactive Preventative Checks Provide Peace of Mind
Identifying a sticky reversing valve or a failing solenoid in late August gives you a massive advantage. HVAC technicians typically have more flexible availability during this late-summer window before the first major cold front hits and emergency heating calls flood the dispatch boards. Addressing minor wear and tear now guarantees reliable performance when you actually need it.
The Value of Early Diagnostics
A thorough preventative check during the milder months ensures that potential mechanical issues are identified early. During a professional tune-up, a technician can manually test the reversing valve, measure the electrical draw of the solenoid, and verify that the system has the exact refrigerant charge required to force the valve to slide smoothly. Taking advantage of off-season maintenance promotions is one of the smartest investments a homeowner can make.
One local homeowner recently reached out for a preventative maintenance check during the colder months, concerned about potential underlying issues with their heating and AC system. The technician arrived promptly, performed a thorough, comprehensive check-up of the entire unit, and carefully explained potential future wear-and-tear without relying on any high-pressure sales tactics. By addressing these minor concerns proactively, the customer felt completely confident in the system's future performance. This is the exact peace of mind an end-of-summer auditory test and follow-up inspection can provide for your own home.
Secure Your Comfort for the Coming Coastal Nights
Testing your system today takes only a few minutes but provides season-long confidence. By listening for the normal 'whoosh' of pressure equalization and keeping an ear out for rapid clicking or buzzing, you take active control of your home's comfort. The coastal Los Alamitos climate demands a heat pump that can seamlessly transition from daytime cooling to nighttime heating without hesitation.
If your auditory test reveals that your system is struggling, or if it remains stubbornly stuck blowing cold air, local experts are ready to help. Professional diagnostics ensure your home remains perfectly comfortable, backed by guarantees that put homeowners first. At AirPoint Heating & Air Conditioning, our 100% Satisfaction Guarantee alleviates the stress of booking a tune-up; if your reversing valve fails your auditory test, you can trust that our technicians will provide an honest, accurate diagnosis to restore your system's functionality.
Frequently Asked Questions
What does a heat pump reversing valve sound like?
A functioning heat pump reversing valve typically produces a distinct, audible "whoosh" sound when it shifts between heating and cooling modes. This sound is caused by the rapid equalization of high-pressure refrigerant moving through the system's copper lines. It usually lasts for two to five seconds and is perfectly normal. After the whooshing sound subsides, the system should settle into the steady, rhythmic hum of the compressor running normally.
How do I switch my heat pump from cooling to heating?
Switching your heat pump from cooling to heating is done entirely through your indoor thermostat. Simply locate the system mode settings on your thermostat interface and change it from "Cool" to "Heat," then adjust the target temperature a few degrees above the current room temperature. You do not need to manually adjust any components on the outdoor unit; the thermostat will send an electrical signal to the reversing valve to automate the transition.
Why is my heat pump stuck in cooling mode?
If your heat pump is stuck in cooling mode, the reversing valve is likely failing to shift physically or electrically. This can be caused by a faulty thermostat, a burned-out electromechanical solenoid coil, or a physical jam inside the brass valve mechanism itself. Because diagnosing the exact cause requires working with high-voltage electricity and pressurized refrigerant, a stuck valve always requires a licensed HVAC professional to repair or replace.
Is a whooshing sound normal when my heat pump turns on?
Yes, a whooshing sound is completely normal when your heat pump first turns on or switches modes. This sound is not air escaping or a sign of a refrigerant leak; it is simply the internal pressure of the refrigerant rapidly balancing as the reversing valve redirects the flow. If the whooshing sound is accompanied by warm air blowing from your vents shortly after, your system is operating exactly as designed.
When should I schedule fall maintenance for my heat pump?
The best time to schedule fall maintenance for your heat pump is in late summer, typically during August or early September. Scheduling your maintenance before the first major cold front arrives ensures that technicians have flexible availability and can address any minor issues before they become emergency breakdowns. Proactive maintenance during this window guarantees your system is fully prepared for the seasonal shift.
Other Blogs
Latest Blog Posts

The Essential Fall Home Maintenance Checklist: Decoding HVAC Startup Smells

Finding Your Efficiency Sweet Spot: Using a SEER Savings Calculator for HVAC Upgrades

Common Homeowner Questions Answered: Why Does My Heater Smell Like Burning Dust?

Customer Testimonials




I recommend Air Point for your HVAC needs."