



The Complete Homeowner's Guide to Safely Starting a Dormant Heating System in Los Alamitos

Waking Up Your Dormant Heating System: The Pre-Winter Challenge
The nights are finally getting chilly, and you walk over to the thermostat to switch it from cool to heat. But as you hover your finger over the button, a wave of hesitation hits. Will it start smoothly? Will it smell like something is burning? Exploring essential home maintenance tips and troubleshooting is the best way to conquer that anxiety before the cold weather truly settles in. For homeowners in Los Alamitos, turning on the heater for the first time after a long, hot summer presents a unique set of challenges. The system has been sitting completely dormant for months, collecting dust and settling into inactivity.
The concrete problem you face is safely starting this dormant residential heating system without risking a sudden mechanical failure or introducing hazards into your home's air supply. This brings up a critical decision point: knowing exactly which pre-season preparations are safe for you to handle yourself, and which internal components require the trained eye of a licensed expert. Making the right call ensures your equipment runs efficiently all season long. If you want to ensure your entire climate control system is ready for the shift in weather, establishing a baseline of professional HVAC services is the smartest first step.
Why Southern California Climates Create Unique Heating Demands
The Problem: Extended Equipment Dormancy
In regions with harsh, freezing winters, heating equipment is heavily used for nearly half the year. However, mild coastal-adjacent winters mean your heating system might sit completely dormant for up to eight or nine months out of the year. While your air conditioning is working overtime to keep you comfortable through the long summer, the heating components inside your unit are entirely inactive. This extended dormancy creates a unique set of stresses that homeowners in colder climates simply do not experience.
The Cause: Dust, Debris, and Mechanical Settling
When a system sits unused for three-quarters of the year, several things happen inside the cabinet. First, significant amounts of dust and airborne particulates bypass the filter and settle directly onto the heat exchanger, burners, and blower motor components. Second, lubricants on moving parts can begin to settle or dry out. Finally, the physical transition from heavy summer cooling to demanding winter heating forces the system to suddenly switch operational modes. Electrical components like capacitors and relays that have been resting are suddenly hit with high voltage demands, which can lead to immediate failure if they have degraded during their time off.
The Solution: Strategic Transition Tactics
The key to overcoming this 8-to-9 month dormancy period is a strategic, phased approach to waking the system up. Instead of waiting for the first freezing night of the year to test the equipment, proactive homeowners should initiate a test run on a mild afternoon. By understanding how the Southern California climate specifically impacts your equipment's lifecycle, you can take targeted steps to ease the transition and prevent the sudden shock of a cold-start failure.
Safe Pre-Season Preparations Homeowners Can Handle
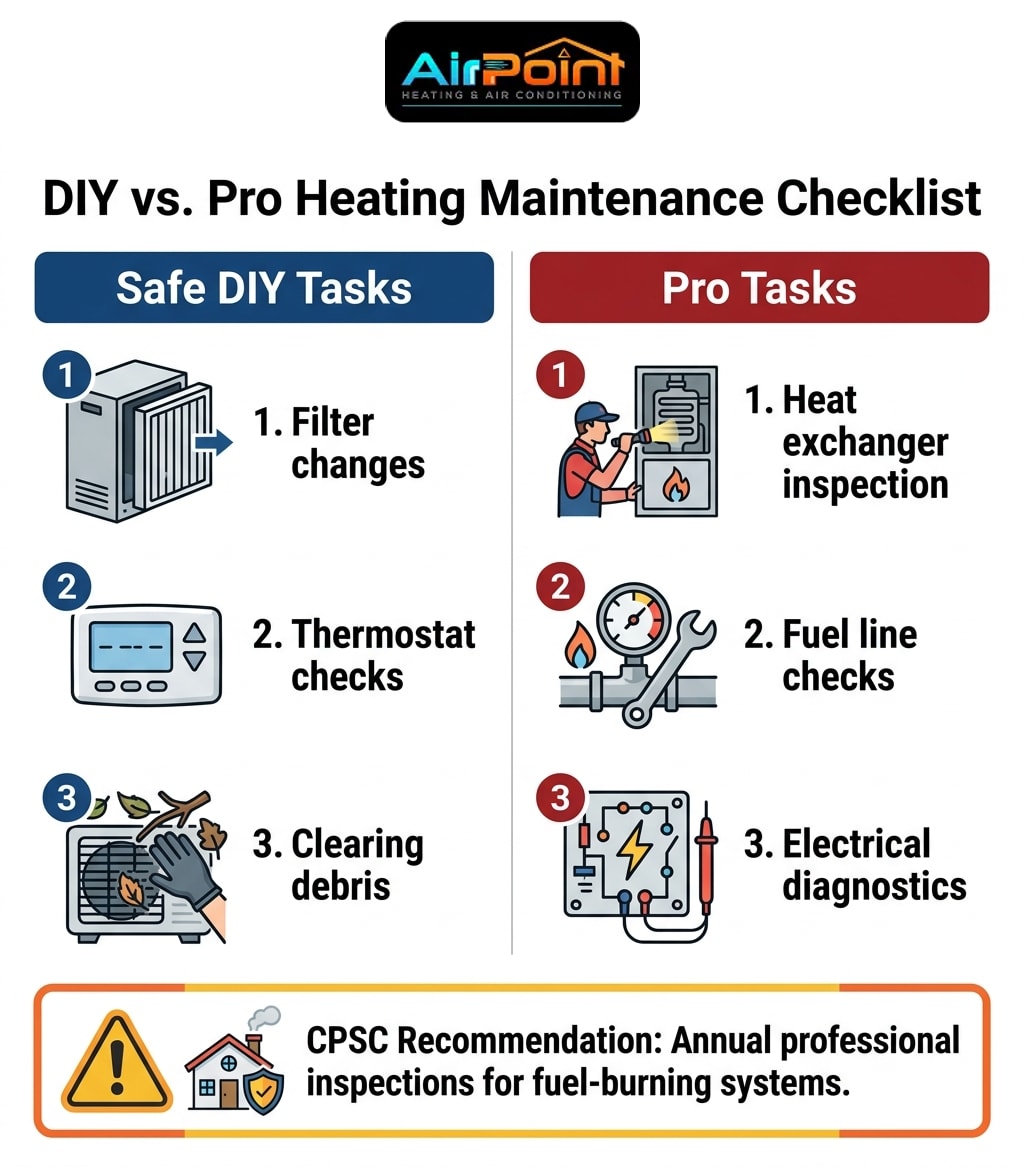
Achieving true November pre-winter readiness means taking control of the maintenance tasks that are safe and accessible. Before you ever switch the thermostat to "heat," there are several vital steps you should take to protect your equipment and ensure optimal airflow. These tasks do not require specialized tools or a license, but they make a massive difference in how your system performs on day one.
1. Change the air filters immediately: After a long summer of cooling, your air filters are likely packed with dust, pet dander, and pollen. A clogged filter severely restricts airflow, forcing the blower motor to work twice as hard to push warm air into your living spaces. Install a fresh, high-quality pleated filter before the first cold snap to guarantee proper airflow and reduce strain on the system.
2. Inspect and update thermostat settings: A surprising number of "broken heater" calls in late fall are simply due to dead thermostat batteries or incorrect programming. Replace the batteries in your thermostat to prevent sudden communication errors between the control unit and the furnace. Ensure the programming schedule aligns with your winter routine, rather than your summer cooling preferences.
3. Clear the perimeter around outdoor units: If you utilize a heat pump for your winter warmth, the outdoor condenser unit needs to breathe. Over the fall, leaves, twigs, and debris can accumulate around the base and fins of the unit. Clear a minimum of two feet of space around the entire exterior unit to ensure it can pull in the air it needs to operate efficiently.
4. Draft-proof windows and exterior doors: Heating efficiency isn't just about the equipment; it is about keeping the warm air inside. Inspect the weatherstripping around your doors and the caulking around your windows. Replacing worn seals prevents drafts from forcing your newly activated heating system to run longer cycles than necessary.
The Burning Dust Odor: Normal vs. Dangerous
One of the most common sources of panic during the first heater startup of the year is a distinct, pungent burning smell spreading through the house. In most cases, this is a completely normal scientific reaction, but it is vital to know the difference between a harmless nuisance and a severe safety hazard.
During the long dormancy period, a layer of household dust settles directly onto the heat exchanger and heating elements. When these components heat up to extreme temperatures for the first time in months, that accumulated dust instantly incinerates. This creates the temporary "burning dust" odor. Typically, a normal dust burn-off should last anywhere from 15 to 30 minutes before dissipating entirely as the airflow clears the vents. If your home requires comprehensive heating solutions, understanding this initial burn-off is a standard part of the seasonal transition.
However, there are specific warning signs that indicate a real hazard. If the smell does not fade after half an hour, or if it changes in character, you must take action.
• Mild, dusty burning smell — Likely Cause: Normal dust incineration on heat exchanger — Required Action: Monitor for 15-30 minutes; open windows if needed.
• Acrid, melting plastic smell — Likely Cause: Overheating electrical wires or failing capacitor — Required Action: Shut system off immediately at thermostat and breaker.
• Sharp, metallic burning or persistent smoke — Likely Cause: Failing blower motor or severe mechanical friction — Required Action: Shut system off immediately; call a professional.
• Rotten egg or sulfur smell (Gas units) — Likely Cause: Natural gas leak — Required Action: Evacuate the home, call the gas company and a pro.
If you experience any of the dangerous odors listed above, the immediate step is to shut off the system completely and call a licensed professional. Never attempt to wait out an electrical or metallic burning smell.
The Danger Zone: Maintenance That Requires Licensed Professionals
While clearing debris and changing filters are excellent homeowner habits, there is a hard line where DIY stops and professional expertise must take over. Crossing this line not only risks destroying your equipment but can introduce life-threatening hazards into your home.
The U.S. Consumer Product Safety Commission strongly recommends annual professional inspections of all fuel-burning heating systems. The primary reason for this mandate is the hidden danger of an uninspected, cracked heat exchanger. The heat exchanger is the metal barrier that separates the toxic combustion gases (like carbon monoxide) from the clean air being blown into your living room. Over years of expanding and contracting, this metal can develop microscopic cracks. If a homeowner misses these invisible fractures, carbon monoxide can silently leak into the home. Only a licensed technician with specialized diagnostic tools can verify the integrity of this critical component.
You must strictly avoid DIY inspections of fuel lines, gas valves, or internal electrical components. High-voltage capacitors can hold a lethal charge even when the system is powered down, and improperly tightened gas fittings can lead to catastrophic leaks. Preventative checkups with documented diagnostic evidence build confidence in your system's safety. One homeowner reached out on a cold winter day when their heater completely stopped working and required prompt attention. A professional team came out the same day, safely diagnosed the internal failure, explained the options clearly, and replaced the dangerous equipment so the home had a safe, efficient heating system working again before nightfall. This level of safety and speed is only possible when you trust a licensed expert. If you are ever in doubt about a provider's credentials, it is always wise to verify an HVAC contractor's liability insurance before allowing them to open your equipment cabinet.
Troubleshooting Unexpected System Failures in Late Fall
The Problem: The System Won't Start or Runs Poorly
Even with careful preparation, dormant systems can sometimes refuse to wake up. You might switch the thermostat to heat, hear a click, and then experience absolute silence. Alternatively, the system might start up but exhibit strange behaviors that prevent the house from reaching a comfortable temperature.
The Cause: Electrical Faults and Imbalances
The most common reasons a dormant system won't start include tripped circuit breakers, blown furnace fuses, or failed run capacitors. If the system has been off for months, a power surge or a degraded electrical connection can halt the startup sequence immediately. If the system does run, you might recognize unusual symptoms like high-pitched squealing noises (indicating a failing blower motor bearing), short cycling (where the heater turns on and off every three minutes), or severe uneven heating across different rooms.
For example, a typical pattern we see involves multi-level temperature imbalances that become glaringly obvious when the weather shifts. One customer found that the upper level of their home was consistently four degrees warmer than the rest of the house, creating a frustrating environment. A professional assessment revealed that the system was struggling to distribute air evenly, leading to a complete system replacement with advanced zoning and a second upstairs thermostat, finally achieving a wonderful, regulated temperature throughout the entire house.
The Solution: Rapid Professional Diagnostics
The importance of immediate professional troubleshooting cannot be overstated when a heater breaks down unexpectedly or exhibits these warning signs. Ignoring a high-pitched squeal or a short-cycling furnace will rapidly degrade the internal components. Rapid diagnostics catch these small electrical faults or airflow imbalances early, preventing minor, easily fixable issues from snowballing into total, catastrophic system failures right when you need the heat the most.
Maximizing Efficiency and Exploring System Upgrades
As you prepare your home for the late fall temperature drop, it is essential to assess the overall health of your equipment. Determining if an older, run-down system is worth a tune-up versus a full replacement is a decision that impacts both your comfort and your monthly energy bills. Systems that are over 10 to 15 years old often suffer from cumulative wear and tear that basic maintenance can no longer fully reverse.
However, professional servicing can often restore a surprising amount of lost efficiency. In one instance during the winter season, a homeowner was dealing with an old, run-down HVAC unit that had a leaky compressor and deteriorating exterior wrap. A professional technician performed a complete, deep-dive tune-up, fixed the leaky compressor, properly adjusted the refrigerant levels, and restored the insulation. The outcome was a massive improvement in system efficiency and the complete resolution of the leaks, giving the older unit a new lease on life.
If your technician determines that the system is beyond reliable repair, exploring system upgrades is the next logical step. Modern, high-efficiency heat pumps and furnaces use significantly less energy to produce the same amount of warmth. Furthermore, there are often generic federal tax credits and local utility rebates available for qualifying high-efficiency upgrades. Because these incentive programs frequently change based on legislation and utility budgets, we always advise readers to consult with professional installers and their local tax advisors to verify which current incentive programs they may qualify for. Upgrading not only ensures reliable heat but can dramatically lower your long-term operational costs.
Frequently Asked Questions About Fall Heating Maintenance
What heating maintenance can I do myself?
Homeowners should focus strictly on airflow and external preparations. You can safely perform filter changes, thermostat battery replacements, and clear outdoor debris away from heat pump units. Keeping return vents unblocked and draft-proofing windows are also excellent DIY tasks. Anything involving the cabinet interior, gas lines, or electrical components must be left to a professional.
Why does my heater smell like burning dust when I turn it on?
This is caused by dust accumulation during the long dormancy period burning off the heat exchanger. When the system fires up for the first time in months, the extreme heat incinerates this settled dust, creating a temporary odor. This smell is perfectly normal and should dissipate completely within 15 to 30 minutes of operation.
How do I safely prepare my heating system for winter?
Safe preparation requires a combination of homeowner diligence and expert oversight. Perform your basic DIY checks—like swapping out the air filter and testing the thermostat—on a mild fall afternoon. Then, schedule an annual professional diagnostic to ensure the internal components, electrical connections, and safety switches are fully operational before freezing temperatures arrive.
How often should a heating system be serviced?
Your heating system should be serviced annually, ideally in the fall before the first major cold snap. Because systems in mild climates sit dormant for so long, this annual checkup is critical for clearing out accumulated dust, lubricating dried-out moving parts, and verifying that no degradation occurred during the off-season.
What are the signs of a cracked heat exchanger?
A cracked heat exchanger is a severe hazard that often presents with soot buildup, unusual formaldehdye-like odors, and, most importantly, carbon monoxide detector alerts. You might also notice a change in the color of the burner flame from crisp blue to lazy yellow. This condition requires immediate professional attention and the system must remain turned off until repaired.
Ensure a Safe, Warm Season with Expert Diagnostics
A clear understanding of necessary pre-season maintenance is the ultimate key to ensuring your home remains safe, warm, and reliable throughout the cooler months. By strictly distinguishing between the safe homeowner tasks—like changing filters and clearing debris—and the required professional diagnostics, you protect your property from sudden breakdowns and dangerous carbon monoxide risks. Achieving true November pre-winter readiness means taking proactive steps before the deep chill sets in.
Don't leave your family's comfort to chance after your system has sat dormant for three-quarters of the year. Backed by a 100% satisfaction guarantee, a professional safety diagnostic gives you the ultimate peace of mind that your equipment is ready to perform. Take control of your home's climate and schedule HVAC service today to secure a flawless, efficient transition into the winter season.
Other Blogs
Latest Blog Posts
Why Your Heating System Smells Like Burning in November: Normal Dust vs. Mechanical Danger
Seasonal Home Maintenance Checklist: Safely Starting Your Dormant Heating System
Home Maintenance Tips and Troubleshooting: October Heating Startup in Los Alamitos

Customer Testimonials


I recommend Air Point for your HVAC needs."