






Why DIY Mini Split Pre-Charged Lines Often Leak Refrigerant After the First Season
The September Surprise: When DIY Cooling Fails Just Before Fall Heating
You installed a ductless unit over the summer to beat the heat, but understanding exactly why DIY mini split pre-charged lines often leak refrigerant after the first season becomes a harsh reality when the system suddenly starts blowing warm air. The installation felt like a success in July. The indoor unit powered on, the outdoor compressor hummed, and cold air flowed into your living space. However, as the calendar turns, that initial success frequently gives way to frustrating performance drops, flashing error codes, and a complete loss of temperature control.
For comprehensive air conditioning services or to schedule a professional mini split installation, reach out to our team to ensure your system is properly secured for the seasons ahead.
When this sudden failure happens during the September early fall transition, Los Alamitos homeowners often assume they purchased a defective unit. At AirPoint Heating & Air Conditioning, our team typically sees a reality that is quite different: the equipment itself is usually fine. The failure almost always traces back to a mechanical issue at the connection points between the indoor and outdoor units. "Pre-charged" line sets are marketed as a plug-and-play solution, giving weekend warriors the false impression that tightening a few nuts is all it takes to secure a high-pressure HVAC system.
As the system runs for a few months, those improperly seated connections begin to weep. By the time you need to prepare your home for cooler weather, the refrigerant level has dropped below the threshold required to heat or cool the space. Recognizing that these slow leaks require professional re-flaring, pressure testing, and precision recharging—rather than just grabbing a wrench to tighten the nuts—is the critical first step in restoring your home's comfort.
The Physics of Copper Flaring and High-Pressure Refrigerants
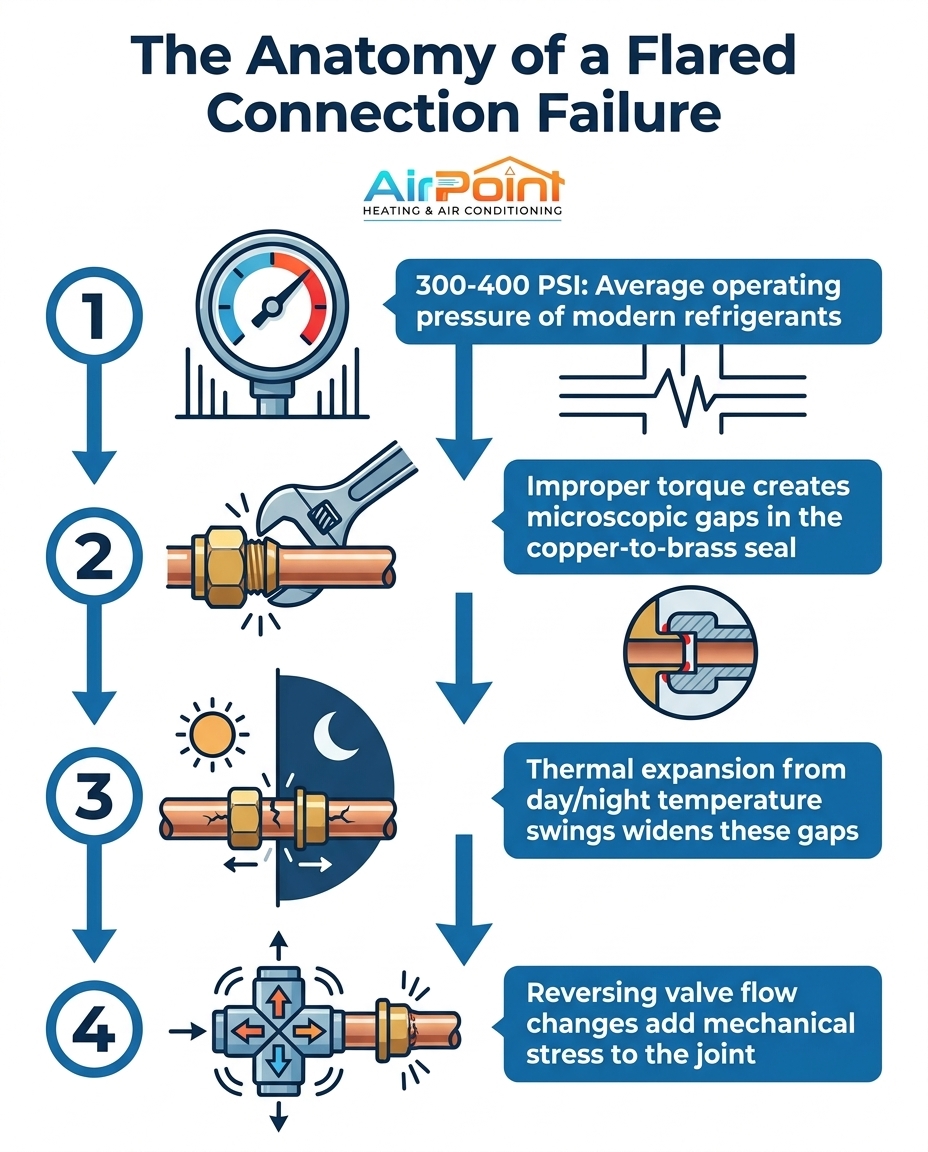
To understand why these connections fail, you have to look at the immense physical forces operating inside a modern ductless system. Today's mini splits utilize highly efficient refrigerants like R-410A and R-32. These are not the low-pressure chemicals of the past. When your system is running, the high side of the refrigerant cycle frequently exceeds operating pressures of 300 to 400 PSI. Containing that much pressure requires an absolute, microscopic seal at every single joint.
The seal in a mini split system relies on a flared copper connection. The end of the copper pipe is widened into a precise cone shape. When the brass flare nut is tightened, it forces the soft copper cone against a matching brass fitting on the unit. Because copper is a relatively soft metal, it yields slightly under pressure, molding itself to the microscopic imperfections of the brass fitting to create a gas-tight barrier.
The DIY approach of making the connection "hand tight plus a quarter turn" completely ignores the physics of this metal-to-metal seal. Without the correct mechanical force, the copper never fully seats against the brass, leaving microscopic pathways for high-pressure gas to escape. Over weeks of operation, these micro-leaks silently drain the system's lifeblood.
Why Torque Specifications Matter
Every mini split manufacturer provides an exact torque specification for their flare nuts, measured in foot-pounds. This is not a suggestion; it is a strict mechanical requirement. A specialized HVAC torque wrench is the only tool that can guarantee this specification is met.
• Under-tightening: Fails to compress the soft copper enough to fill the microscopic grooves in the brass fitting, allowing high-pressure refrigerant molecules to slip past the barrier.
• Over-tightening: Crushes the copper flare entirely. The metal becomes too thin, weakens, and eventually splits or shears off under the stress of vibration and pressure.
• Uneven tension: Using standard adjustable wrenches often applies uneven, lateral force to the fitting, warping the delicate copper cone before it even has a chance to seal.
• DIY "Hand Tight" Approach — Seal Quality: Inconsistent, relies on guesswork and feel — Risk of Refrigerant Leak: Extremely High (Often fails within months)
• Factory Pre-Made Flares — Seal Quality: Good, but requires exact line length with no adjustments — Risk of Refrigerant Leak: Moderate (Depends heavily on final nut torque)
• Professional Custom Flare & Torque — Seal Quality: Perfectly mated, verified with digital micron gauges — Risk of Refrigerant Leak: Very Low (Designed to last the life of the system)
Thermal Expansion: How Coastal Climate Swings Expose Micro-Leaks
Even if a poorly torqued connection manages to hold for the first few weeks of summer, environmental factors quickly begin to test its limits. Metal components are highly susceptible to thermal expansion and contraction. When exposed to heat, copper and brass expand; when exposed to cold, they contract. Because copper and brass are different alloys, they expand and contract at slightly different rates.
In our years of serving the Los Alamitos area, our technicians have seen firsthand how late summer to early fall temperature swings provide the perfect catalyst for exposing weak DIY joints. During the day, the outdoor equipment bakes in the warm coastal sun while hot, high-pressure refrigerant flows through the lines. As the sun sets and the cooler coastal evening temperatures roll in, the metal components rapidly cool and contract.
This daily cycle of expanding and shrinking forces the flare nut, the copper cone, and the brass fitting to constantly shift against one another. If the connection was properly torqued to manufacturer specifications, the metal-to-metal seal remains tight enough to absorb this movement. However, if the joint was merely tightened by hand feel, this thermal cycling gradually loosens the connection.
The slow fade of comfort: Because these micro-leaks are incredibly small, the system does not empty overnight. Instead, it loses a tiny fraction of an ounce every time the temperature swings. This gradual loss means the system loses capacity over several weeks or months, forcing the compressor to run longer and harder until it finally triggers a low-pressure error code right when you need the system most.
The Reversing Valve Stress Test: Switching from Cooling to Heating
The changing of the seasons brings another massive mechanical hurdle for an improperly installed ductless system. Heat pumps are brilliant pieces of engineering that provide both cooling and heating from the same equipment. They achieve this using a crucial component called the reversing valve.
When you prepare your home for fall and switch your thermostat from cooling to heating, the reversing valve physically shifts inside the outdoor unit. This action completely reverses the flow of refrigerant through the entire system. The indoor coil, which acted as an evaporator to absorb heat during the summer, suddenly becomes a condenser to release heat into your room.
This reversal abruptly changes the pressure dynamics across all the indoor and outdoor connection points. A joint that spent the entire summer under low-pressure suction is suddenly slammed with high-pressure hot gas. For comprehensive heat pump services, ensuring these valves and connections are secure is paramount. This sudden mechanical and thermal shock is often the final straw for a poorly torqued flare joint. The sudden realization that the system is blowing cold air when you desperately want heating is a direct result of this pressure shift blowing past a compromised seal.
The Deformation Dilemma: Why You Cannot Just Tighten a Leaking Flare Nut
When a homeowner discovers a leak at the connection point, the immediate instinct is to grab a wrench and crank the brass nut down as tightly as possible. This is a dangerous DIY misconception that almost always makes the problem worse.
The physics of copper deformation dictate that once a flare is crushed improperly, or once the mating surface is scarred by high-pressure gas escaping over several weeks, the metal is permanently compromised. Copper is a one-time-use seal in this context. You cannot simply squeeze a damaged piece of metal harder and expect it to magically fill the microscopic grooves it has already failed to mate with.
Attempting to over-tighten a leaking joint usually results in shearing the copper completely off, instantly venting whatever refrigerant remains in the system into the atmosphere. The only permanent, reliable fix for ductless cooling systems that have developed a flare leak is to start over. The remaining refrigerant must be safely recovered, the damaged copper flare must be cut off entirely, and a brand new flare must be created using professional flaring blocks and eccentric cones. This is strict professional territory, requiring specialized tools and training to ensure the new seal is flawless.
Professional Diagnostics: The Role of Nitrogen Testing and Micron Gauges
The difference between a DIY installation and a professional commissioning process comes down to verification. A professional never assumes a connection is leak-free just because it feels tight. By relying on professional pressure testing and specialized torque wrenches, licensed technicians prevent these exact seasonal failures from happening in the first place.
Recently, our AirPoint Heating & Air Conditioning team helped a local homeowner who arranged for two Daikin mini split systems to be installed during the summer. By relying on our professional tools and rigorous testing protocols from day one, we secured reliable performance across the seasons, and they remain extremely happy with the new systems. The professional diagnostic and commissioning process involves several non-negotiable steps:
1. High-Pressure Nitrogen Testing: Before any expensive refrigerant is released into the lines, a professional isolates the system and pressurizes it with dry nitrogen. Nitrogen is an inert gas that can safely be pressurized to test the physical integrity of the flares. If the pressure gauge drops even a fraction of a PSI over a set period, the technician knows a micro-leak exists and can correct it before it becomes a problem.
2. Bubble Testing: While the system is under high nitrogen pressure, a specialized micro-leak detector solution is applied to every single joint to visually confirm there are no microscopic bubbles forming at the flare nuts.
3. Deep Vacuum Evacuation: Once the system is proven to be completely sealed, a vacuum pump is connected. However, the pump alone isn't enough. A professional uses a digital micron gauge to measure the depth of the vacuum. This process removes all non-condensable gases and boils off any microscopic moisture trapped inside the copper lines.
4. Decay Testing: The vacuum pump is valved off, and the micron gauge is monitored to ensure the vacuum holds steady. If the micron level rises, it indicates either a lingering leak or remaining moisture—both of which will destroy a compressor over time.
Only after these rigorous tests are passed will a professional release the refrigerant charge, guaranteeing long-term reliability and efficiency.
EPA Regulations and the Legal Reality of Handling Refrigerant
Beyond the mechanical complexities, there is a strict legal reality to repairing a leaking mini split. Refrigerants are heavily regulated chemicals due to their environmental impact. The Environmental Protection Agency (EPA) mandates under Section 608 that the handling, recovery, and recharging of refrigerants must be performed exclusively by certified technicians.
Venting refrigerant into the atmosphere is illegal and environmentally harmful. This includes accidental venting caused by a botched DIY repair attempt, such as shearing off a flare nut or improperly disconnecting a pressurized line. The penalties for violating these environmental regulations are severe.
Furthermore, the modern refrigerants used in these systems cannot simply be "topped off" with a can purchased online. R-410A, for example, is a blended refrigerant. When it leaks, the different gases in the blend leak at different rates, meaning the remaining refrigerant in your system is no longer the correct chemical composition. Attempting to recharge a system without recovering the old charge, pulling a deep vacuum, and weighing in the exact factory charge with a digital scale will lead to catastrophic compressor failure. Understanding these regulations is one of the crucial hidden costs of DIY mini split AC installations.
Frequently Asked Questions About Mini-Split Refrigerant Leaks
Why is my DIY mini split losing cooling or heating capacity?
A gradual loss of capacity is the primary symptom of a micro-leak at the flared connections. When the system lacks the proper volume of refrigerant, it cannot absorb or reject heat effectively. The compressor will run longer to try and compensate, eventually leading to warm air blowing from the indoor unit and potential system lockouts.
How do you fix a mini split refrigerant leak?
The system must be properly evacuated, the bad flare cut off and remade, and the new connection pressure tested with dry nitrogen. Once the seal is verified, a vacuum must be pulled using a digital micron gauge to remove moisture, followed by weighing in a precise, fresh charge of refrigerant. This process requires specialized tools and a licensed professional.
Can I recharge a mini split myself?
No. EPA regulations require specific certification to handle, recover, and purchase modern refrigerants. Furthermore, improper charging without a digital scale and gauge manifold will almost certainly overcharge or undercharge the system, which can permanently destroy the compressor.
Do DIY mini splits need a vacuum pump?
While some "pre-charged" kits claim to skip this step by using specialized quick-connect fittings, failing to pull a proper vacuum on standard flared lines is a major cause of moisture contamination and eventual failure. Moisture inside the lines reacts with the refrigerant oil to create acids that eat the system from the inside out.
How long do pre-charged mini split lines last?
If perfectly torqued, professionally verified, and free of moisture, the copper lines themselves can last the life of the system. However, if they are improperly installed or tightened by hand-feel without a torque wrench, the connections often fail within the first season of operation due to thermal expansion and pressure stress.
Securing Your System for the Seasons Ahead
While DIY kits offer an undeniable upfront appeal, the physics of high-pressure refrigerants demand professional precision. The transition from summer cooling to fall heating applies immense mechanical and thermal stress to your system's connection points. If those joints were not torqued to exact manufacturer specifications and verified with high-pressure nitrogen, they are highly susceptible to failure.
Resolving a slow leak properly ensures the system will perform efficiently and safely through the upcoming heating season. If you are noticing a drop in performance, flashing error codes, or suspect you are discovering exactly why DIY mini split pre-charged lines often leak refrigerant after the first season, do not attempt to tighten the fittings yourself. Encourage long-term reliability by seeking a professional evaluation from our AirPoint Heating & Air Conditioning team to re-flare, test, and recharge your system before the colder weather sets in. Additionally, professional commissioning ensures your equipment operates safely and may help you qualify for generic utility incentive programs or federal tax credits that may apply to qualifying heat pump installations.
Other Blogs
Latest Blog Posts

How to Inspect Your Attic Ductwork for Rodent Damage Before Winter Sets In

Addressing Fullerton's Unique Microclimate Shifts During Fall HVAC Transitions

Why We Check Your Carbon Monoxide Detectors Before Firing Up Older Gas Furnaces

Customer Testimonials




I recommend Air Point for your HVAC needs."